Make this as hot or as mild as you like by adjusting the seasoning. Enjoy with the hot pineapple salsa and a fresh, crisp salad. Also great with some proper, crispy chips (sprinkled with sea salt) for an extra special treat!
For the Salsa
175g Fresh Pineapple (tinned and drained if you can't get fresh)
4 Spring Onions, chopped
50g Red Pepper, chopped
5mm piece root Ginger, grated
15ml Cider vinegar
15ml Soft brown sugar
60ml Barbeque sauce
Jerk Chicken
4 Chicken breasts, boned and skinned
60ml Rapeseed oil
30ml Lemon juice
15ml Jamaican Jerk / Cajun seasoning (adjust to taste)
1. Preheat your grill to a medium/hot setting.
2. To make your salsa, into a saucepan place all of your ingredients and warm through over a gentle heat.
3. Make 2/3 incisions into the chicken breasts with a sharp knife and rub all over with 30ml of the oil.
4. Sprinkle over the Jamaican Jerk/Cajun seasoning.
5. Mix the remaining 30ml oil with the lemon juice to use as a baste for the chicken breasts.
6. Grill the chicken breasts, seasoning side up for 4-5 minutes.
7. Baste occasionally with the oil and lemon juice mixture.
8. Turn over the chicken and grill for 3-4 minutes on the other side.
9. Turn over the chicken breasts back over to the seasoning side up, baste with the remaining baste and turn up the grill to the highest setting.
10. Grill for 5 minutes until crisp and dark in colour.
11. Serve with some of the warm pineapple salsa.
For the chicken breasts, if you prefer, you can either
a) Fry strips of the seasoned chicken for 8-10 minutes, or
b) Baste, season and cook the whole chicken breasts for 15 minutes at 190°C
North Northamptonshire based food blogger who is obsessed with good food and proper cooking. I'm part of the Midlands Blogging team for the BBC Good Food Shows. This is where I share my own recipes and carry out recipe development and product reviews for brands, including food and wines. Please contact me using the link below.
Monday, 10 February 2014
Saturday, 8 February 2014
Russell Hobbs Allure Espresso Machine Review
As a coffee lover, I was excited to be sent an Allure Espresso Machine to review from Russell Hobbs. The brushed stainless steel and black finish is elegant as well as easy to keep looking clean & stylish.
This compact machine packs a whopping 15 bar pressure through its' pump and comes with a measuring spoon/coffee grounds tamper as well as both a single and a double espresso coffee grounds holder.
They've thought of everything a coffee maker needs, so you can find a cup holder/warmer on top of the machine.
The machine incorporates a 1.5 litre on board water tank which you can either fill in situ, or remove and fill from the tap. It's capable of making espresso, latte or cappuccino coffees as well as being used as a hot water facility or just a milk frother for your hot chocolate drink.
Using the machine couldn't be easier either. Simply select whether you're going to make one or two cups of espresso, and place the relevant holder into the handle. Scoop one/two spoons of your coffee into the holder and gently tamp it down, making sure to clean off any stray coffee grounds from around the edges of the holder, to ensure a good seal to the machine. It's also able to work with the ESS coffee pods that you can buy. In this case, just ensure that you do not leave any of the paper frill outside the holder that would prevent the seal being made to the machine.
Lining up the handle with the left hand corner of the machine, insert the handle into the base of the coffee machine so the lugs slot into place.
Turn the handle to the right until it's at right angles to the front of the machine.
Switch on the machine using the bottom rocker switch. You will hear a noise initially as the 15 bar compressor starts up.
Place your cup(s) on the drip tray underneath the nozzles. Turn the top rocker switch to the 'two drip' (water) setting and rotate the large centre switch to the right towards the image of the cup & saucer.
Fill your cups to approx 1/3 full. Rotate the centre switch back to the left to the 'X' to stop the flow of water. Your machine will continue to purge the water held in the system.
Rock the top switch to the left towards the steam icon. Place a tall jug of milk under the frother arm & rotate the centre switch to the left towards the two drip/steam icon.
Making sure you keep the frother nozzle under the surface of the milk, allow the steam to go through it, which both heats and froths it.
From my finished cappuccino below, I'm sure you can understand why the barristers of this world are in no way worried about their job being stolen by me when you can see my attempt at 'coffee art'!
To clean the machine couldn't be easier either. Pull off the black milk frother attachment. Be aware that this may still be hot, depending on how long it's been since you made your coffee. Wipe the stainless steel frother tube to remove any milk residue.
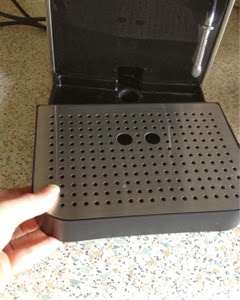
Pull the drip tray forwards.
Lift the drip tray grill.
Remove the insert at the back of the drip tray, pulling it forwards and then upwards.
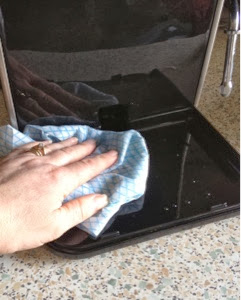
Wipe over the base with a damp cloth.
I was recommended to try Lavazzo coffee by an Italian friend of mine & I'm glad that I did. It's a rich coffee which produces a lovely smooth crema on your espresso and works perfectly with the Russell Hobbs Allure Espresso machine.
The machine is simple to use but I found that I needed to hold my coffee cup in position when making it as the powerful compressor has a habit of vibrating the cup away from underneath the outlets. It's not a silent machine either due to the power, but then again, I didn't expect it to be; it's not overly noisy or offensive sounding and certainly wouldn't deter me from using it. It's simple to clean and doesn't take long to get it ready for your next drink.
Would I be disappointed with this machine if I'd bought it? No, I wouldn't.
Would I recommmend it to fellow coffee lovers? Yes, indeed I would.
The machine was kindly sent to me by the PR company of Russell Hobbs. I have not been paid for this review and the views expressed are a reflection of how I found the machine during operation.
Friday, 7 February 2014
Sunday Roast anyone?
To celebrate Knorr stock pots being awarded Product of the Year in the consumer voted Gravy & Stock category, I was sent all the ingredients last week with which to create an incredible Sunday lunch. Succulent lean beef, fresh vegetables and a supply of the stock pots, along with a china gravy boat were delivered on Saturday while I was in London enjoying the delights of Borough Market and celebrating my birthday the following day with two close friends.
I'm an absolute traditionalist when it comes to my Sunday dinner, with a roast being on the menu pretty much every week. What better way to round off the week than with good food, fresh and healthily prepared with lots of steamed veg & a rich gravy.
My beef was roasted slowly at 150C for a few hours in a roaster to keep it moist. Whilst the meat was resting, I roasted half of my potatoes and parsnips in a hot oven, along with my Yorkshire pudding (always with chopped onion added to the mixture as my mum does!) The remainder of my potatoes, I cut up & boiled with the rest of the parsnips, the carrots & broccoli steaming above them. Into a large saucepan, I put my meat juices and a beef gravy pot, and brought them to the boil whilst whisking. To this I added a little of the leftover Yorkshire Pudding mix that I'd loosened slightly with cold water and returned it to the boil to thicken before reducing it to a simmer. A couple of splashes of Tabasco sauce and a glug of double cream and it was tasting amazing! Dinner was served with a dollop of hot horseradish sauce, making it a meal to remember!
It may have been my birthday last Sunday, but I didn't mind cooking my roast, and boy! Did we all enjoy eating it too!
Knorr gravy pots can be used on their own, whisked into boiling water. You don't need to use meat juices, to thicken them, or add any additional ingredients.
The hamper of food was sent to me free of charge by Knorr. I was under no obligation to provide a favourable review of the contents, nor to endorse the products contained therein. All views are my own.
Subscribe to:
Comments (Atom)


