North Northamptonshire based food blogger who is obsessed with good food and proper cooking. I'm part of the Midlands Blogging team for the BBC Good Food Shows. This is where I share my own recipes and carry out recipe development and product reviews for brands, including food and wines. Please contact me using the link below.

Friday, 30 December 2011

Chocolate Brownie

A well stocked store cupboard should contain all of the ingredients needed for this recipe.  Walnuts are optional, and can easily be excluded without affecting the recipe if you like.  So, let's get started...

100g (4oz) Plain flour
4 eggs
225g (8oz) Caster sugar
225g (8oz) Butter
50g (2oz) Cocoa Powder
2.5ml (½tsp) Baking Powder
7.5ml (1½tsp) Vanilla Extract
100g (4oz) Chocolate, chopped/Chocolate drops
16 walnut halves (optional)


1. Preheat the oven to 180°C/Fan 160°C/Gas 4.

2. Grease a 9" square tin and line the base with baking parchment.  I've found the best performing baking parchment is this one from Lakeland Limited.  I've used it loads and, so far, it's never stuck on me.


3. In your bowl place your flour, eggs, sugar, butter, cocoa powder, baking powder, and vanilla.  Mix together for several minutes until thoroughly combined.  I used my Kenwood Major on high speed for 4 minutes to incorporate as much air as possible.


4. Add the chocolate drops and stir until just mixed.


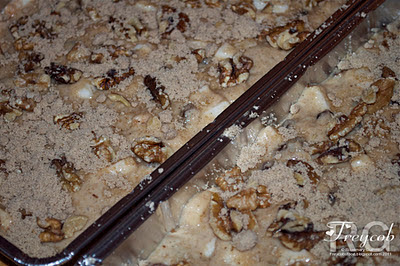
5. Pour into  your prepared tin, smooth the top and place 16 walnut halves on top to mark out each of the 16 pieces your brownie will be cut into.


6. Bake for 40-45 minutes.  You will notice that the top of a brownie sometimes 'bursts' through as it cooks.  This is normal; don't worry.

7. Test the brownie in the centre with a cocktail stick.  If it comes out fairly clean (a little bit of 'goo' is ok, but not lots!) then your brownie is cooked. If the cocktail stick is still very wet, then place the brownie back into the oven for 5 minutes and test again.  If the top is browning too much, then place a sheet of foil loosely over the tin for the last 10 minutes.


8. Remove from the oven.  Leave to rest for 2-3 minutes in the tin, then make sure that the edges aren't stuck to your tin (use a plastic spatula if you're using a non-stick metal tin.  Turn out onto your wire cooking rack.

Can be served either warm - with custard, cream or ice cream - or left to go cold and enjoyed with a nice cuppa while you put your feet up!

Enjoy!

Rosie
x

Wednesday, 21 December 2011

Rosie's Christmas Rum butter

Tradition in our house is to serve Christmas pudding with rum butter. Why rum? Well my dad was a Submariner in the Royal Navy when he was younger and is still partial to a 'tot' of rum that they used to be served on board daily. Mum therefore created her own accompaniment based on this love of rum and it's been served up ever since.

It's so easy to make; just 3 simple ingredients.


250g (8oz) butter, softened
500g (1lb) icing sugar
A good splash (or even a glug) of dark rum

I trust the wonderful Kenny to whizz this together for me, but you can use a hand mixer if you don't have one of these gorgeous machines.


1. Add all the ingredients to a large bowl.

2. Start by mixing slowly until the icing sugar and butter are just combined (starting slowly prevents a huge sugar dust storm enveloping the whole of you & your kitchen).

3. When this is just combined, turn the speed up to maximum and beat for 4-5 minutes until light & fluffy.


4. Taste and add more rum if required.

5. Spoon into little dishes and refrigerate until required.


This will keep for as long as your butter is in date. In this case about 6 weeks until 6th February 2012. No chance of that in my house of course as the family are coming for Christmas dinner and all adore rum butter on their pudding. It's also got to last until Christmas day (I'll be watching for the fridge raiders!)

A tasty alternative is to heat a mince pie for 20 seconds in the microwave and then add a generous dollop of your rum butter on top. Leave for a short while to start to melt the butter & enjoy with your feet up whilst listening to a lovely Christmas carol or two!


Alternatives to rum would be any liqueur or spirit such as whisky, brandy, Grand Marnier (for an orange kick).

Let me know if you try it.

Merry Christmas!

Rosie
X

Thursday, 3 November 2011

Sausage Casserole

Who buys packet casserole mix? WHY do you buy packet casserole mixes? Do you know just how EASY it is to make your own; do you KNOW what is in it (no preservatives, copious amounts of salt or 'E' numbers) No? Then let me show you.

Simply take (remember it's cooking not baking so it's not a precise science; add or take away ingredients that you do or don't like, even alter the proportions to suit your taste).

1 HEAPED tbs (20ml) plain flour
1 HEAPED tbs (20ml) tomato puree
1 HEAPED tbs (20ml) wholegrain mustard
2tsp (10ml) mixed herbs
1 400g chopped tomatoes
1 pint (570mls) Beef/Chicken stock.
1 pack of your favourite sausages (I use Lincolnshire)
1 medium swede, diced.
3 medium carrots, diced
1 large onion, chopped
2 medium parsnips, diced
1 red pepper, diced


Oven temperature from 150°C to 180°C depending on how quickly you want it to cook. I normally do mine on 150°C for a few hours. Alternatively, why not put it all into your slow cooker and come home to the amazing smell of your home cooked fayre?

1. In a large casserole dish, put your flour, tomato puree, mustard, herbs and chopped tomatoes.


2. Add the stock and mix thoroughly.


3. Add the chopped vegetables and stir through.


4. Add the sausages (I don't bother to brown mine as it's a slow cooked recipe). You MAY need to add some more water at this stage. You want it to submerge the majority of your veg but not all.


5. Place in the oven and ignore for the next couple of hours or so.


6. Remove, stir through and serve with buttery mashed potatoes and some lovely Savoy cabbage.


Perfect for a cold Autumn or Winter's evening.

Now you've seen just how EASY it is to make your own casserole sauce, why not have a go for yourself? Come back and tell me how you got on!

Rosie
x


Sunday, 30 October 2011

Cupcakes, creatures and Holly Bell!


This isn't a recipe today, but I HAD to share with you my day out yesterday with none other than the very lovely Holly Bell.

I had a truly amazing day yesterday (29th). Two reasons; it was my mum's 74th birthday and we had a family meal out, but before that I attended a course on cupcake decorating with Holly Bell (one of the finalists from the Great British Bake Off).


The theme of the day was creatures & flowers. We were welcomed by the very smily (and very genuinely warm & friendly) Holly at Bridge 67 Cookery School in Smeaton Westerby, Leics. We enjoyed a bite of breakfast over coffee, tea and juice, where we introduced ourselves and were presented with our itinerary and the most comprehensive & detailed set of instructions you could hope for.

Our day in the kitchen then began with a demonstration of Holly's recipe to make the cupcakes. Then it was our turn to make ours. 12 cupcakes made & cooling later and it was on to making the fondant decorations.

Following a demonstration and with the aid of the wonderfully detailed set of instructions, we first cut some butterflies, flowers & leaves, formed them & left the to dry. (Forgot to photograph these, sorry!)

Next came the cutest little snails. I was surprised that mine did actually look like snails and not just strange slugs, but they really did! *happy dance*


We moved on to ladybirds & rose buds, followed by tortoises and plant pots. By now we were all flying with confidence under Holly's expert guidance.


A break for lunch brought us beautifully crafted & presented sandwiches, crisps and home made biscuits to die for! There was even a glass of wine for those who wanted it!

Back into the kitchen afterwards we made buttercream that was as smooth and light you could float away as if on a cloud.

Now the assembly began! The buttercream was tinted as green as grass in the sunniest of meadows and our we 'planted' our roses and sat our ladybirds down in the sun beside them.


We rolled fondant & impressed a wood grain effect ready to place our snails; complete with a leaf or two to munch on.


Green fondant became grass on which our tortoise sat beside a pretty little plant pot of blooms.


A white full moon background became home to our owls; resting on a branch being all wise and seeing.


While others made ducks, I made robins and sat them on the sea of a swirly blue bird bath.


Holly taught us to pipe 'roses', 'swirls' and 'high hat' with buttercream on which we 'landed' our butterflies before we painted, glitzed and embellished them to shine & sparkle.


We were given lovely gold cake boxes into which we brought our creations home to share with our loved ones.


Mine came with us to the restaurant (complete with my cake stand) as a centrepiece for mum's birthday. Mum loved them & they also received admiring glances and complimentary remarks from the waiters & waitresses too.


We sadly had to leave Holly and the cookery school at 5:15pm, but not before we were each given a bag of her wonderful homemade biscuits to enjoy later with a cup of tea.


Armed with the wonderful memory of a fantastic day with a fabulous teacher in the company if some truly talented and lovely ladies, not to mention incredibly detailed notes for our future creations, we hugged and sadly said our farewells. Not goodbye but see you again in the future!

Holly, I wish you the best of everything I would hope for myself. You have a wonderful personality, a kind nature & a skill in presentation & teaching that many would envy! May your future take you to the moon & back. Your butterfly wings have grown; let them unfurl and you will fly!

Love, hugs and thanks xxx

Wednesday, 26 October 2011

Pannini with mozzarella & pesto

Another quick lunch recipe from me today:  Pannini with Sun-dried tomato pesto, tomato and Mozzarella.  Quick, easy and oh, so tasty!

Simply take:

1 pannini per person and slice horizontally
Spread generously with some Sun-Dried Tomato Pesto (my fave is by Sacla)
Top with slices of fresh tomato
Add a couple of slices of Mozzarella cheese


I make mine in my sandwich press (one with flat plates) for a few minutes until golden and the cheese has melted.


You'll find that the mozzarella cheese goes a little bit chewy, so be careful when you bite into it.


Enjoy!  x

Tuesday, 25 October 2011

Home made Hummus

I was after something quick and tasty to cook for lunch today so this is what I made.

There are lots of recipes out there for Humous (as well as lots of ways of spelling it!) This is the one that I use;

1 x 400g tin Chick peas, drained and rinsed
½tsp (2.5ml) Sea Salt (or to taste)
3 cloves of Garlic, peeled
4 tbs (60ml) Tahini paste
1 Lemon, juiced
¼tsp (1.25ml) Cayenne pepper (or to taste)
2-4tbs Soured cream

And this is how easy it is to make...

1. Place all of the above into a food processor, apart from the soured cream, and blitz to a smooth paste (this takes a few minutes).

2. Stop the processor after each minute or so and scrape down the sides to ensure that it is all evenly blended.

3. Adjust the lemon juice, salt and Cayenne pepper to your personal taste; adding a little more if necessary.  This mixture will still be quite thick.

4. Mix in a couple of tablespoons of soured cream and blend further.

5. Continue to add the soured cream, a tablespoon at a time, and then blend until you achieve the right consistency.  Personally I like it to 'blob' off the spatula.


6. Serve with hot toasted pitta breads or vegetable sticks such as carrots, celery, peppers etc.

Monday, 24 October 2011

Spiced apple & sultana cake

9oz (250g) Plain Flour
2tsp (15ml) Baking powder
½tsp (2.5ml) Salt
1½tsp (7.5ml) mixed spice
4oz (110g) Granulated sugar
1 egg
5 floz (140ml) Milk
3floz (90ml) Corn oil
6oz (170g) Apple, chopped
1oz (25g) Sultanas
1oz (25g) Walnuts, chopped (optional)
2-3tbs (30-45ml) Soft brown sugar
Icing:
Juice of one lemon
Icing sugar


Oven temperature 190C / Gas Mark 5

Ok let's cook!

1. Into a large bowl, mix the flour, baking powder, salt, mixed spice and sugar together.


2. In a separate bowl/jug mix your egg, milk and oil.


3. Mix together until just combined.  Do not beat and don't worry if there's a small lump or two.  Just make sure that all the flour mix is combined.


4. Stir in the chopped apple & sultanas.


5. Don't worry that this mixture seems a little dry as the apples will release some liquid as they're cooked.


6. Pour your mixture into a greased traybake tin (or disposable foil traybake tray).  Alternatively, divide between 12 large muffin cases/wraps.


7. Sprinkle the top with the walnuts (if using) and then the sugar.


8. Bake for 20-25 minutes or until golden brown and cooked.


9. Allow to cool and then mix the lemon juice with enough icing sugar to make quite a thick icing.  Drizzle randomly over the top of the cooled cakes.


These can be served still warm from the oven or left to cool.  They're also lovely warm topped with custard or ice cream.

Sunday, 26 June 2011

Rosie's Sausage House Hash

I've got another quick savoury recipe to share with you today.  A fave in our house or even caravan if we're away and really quick & easy to make too.  Let me share it with you.  You will need:


1 1/4lbs potatoes, peeled and roughly chopped
1 large onion
1 pack (about 1lb) Cumberland / Lincolnshire sausages
3tbs olive oil
1 or 2 cloves of garlic
1tsp paprika
salt & pepper to taste
8oz mushrooms (optional)
3/4 pint beef or onion gravy

Oven temperature 190C / Gas Mark 5

Ok then, lets get those ingredients prepped:

1. Peel your potatoes and cut them into bite sized pieces. (oops!  forgot to photograph them).  Place them in cold water, bring to the boil and simmer for 10 minutes while you prepare the other ingredients.

2. Slice your onions.


3. Crush your garlic.


4. Gently fry your sausages until browned all round, remove and set aside.


5. Add a little oil into the pan that you cooked your sausages in and fry for 4-5 minutes until starting to become transparent.  Add the garlic and cook for 1-2 minutes.


6. Drain your potatoes and add them to the onions and garlic with the paprika.


7. Stir to coat well and cook for a further 2-3 minutes.


8. Cut each sausage into 3 diagonally (only because it makes them look nicer!) and then add them to the pan. Season and mix well.


9. Pour the potato and sausage mixture into an ovenproof dish and pour the gravy over the top.  Mix gently to coat.


10. Place in the oven for about 20 minutes until the sausages are cooked through.


11. Serve with steamed carrots or broccolli.


Enjoy, and if you do follow my recipe and like the result, please return and leave me a comment.

Thanks.


Rosie
x
Related Posts Plugin for WordPress, Blogger...