North Northamptonshire based food blogger who is obsessed with good food and proper cooking. I'm part of the Midlands Blogging team for the BBC Good Food Shows. This is where I share my own recipes and carry out recipe development and product reviews for brands, including food and wines. Please contact me using the link below.
Showing posts with label eggs. Show all posts

Saturday, 14 March 2015

Aldi's best budget bake - Tiramisu cupcakes

Having been invited to take part in a food blogger challenge to celebrate Aldi Specialbuys Home Baking range which are on sale from Sunday 15th March 2015, we each received a hamper containing some of the range of kitchenware that would be on sale in store, along with a voucher with which to buy our ingredients.


Spurred on by the contents of my hamper, I chose to make some Italian Tiramisu inspired cupcakes and duly nipped out to Aldi to buy my ingredients: Eggs, self raising flour, caster sugar, butter, ground almonds, icing sugar, soft cheese, Amaretto, chocolate sprinkles and cupcake cakes. From my store cupboard I added almond extract and a splash of milk along with some coffee.  Here is how I made them:

For the Cakes (Makes 12):
4 Large free range eggs
140g Self raising flour
200g Caster sugar
200g Butter, softened to room temperature
80g Ground almonds
5ml almond extract
30ml milk
For the icing:
50g Butter, softened to room temperature
50g Soft cheese
250g Icing sugar
20ml Espresso (or very strong) coffee
15ml Amaretto
1 tub Chocolate sprinkles

1. Preheat the oven to 190℃.
2. Line a 12 hole cupcake tin with cupcake cases.


3. Place a large bowl onto your scales and add your eggs, reset the display to zero, then weigh in the flour, caster sugar, butter, ground almonds, almond extract and milk.


4. Using an electric mixer, thoroughly mix your ingredients together until light and fluffy.
5. Divide the mixture between your cupcake cases, making sure not to overfill the cases more than ¾ full.
6. Bake on the centre shelf of your oven for 15-18 minutes until lightly brown on top and a toothpick inserted into the centre of the cupcake comes out clean.
7. Remove the cupcakes to a cooling rack and leave until cold.


To make the icing:
8. Place a large bowl on to your scales and weigh in the butter and soft cheese.
9. Remove the bowl from the scales, and using your electric mixer, beat these two ingredients together until fully combined.
10. Place the bowl back on your kitchen scales (reset the display to zero) and weigh in the icing sugar.
11. Measure in the espresso coffee and the Amaretto.


12. Starting slowly to prevent a huge dust storm of icing sugar, combine the icing ingredients together.
13. When the icing sugar is fully combined into the butter, soft cheese, coffee and Amaretto mixture, increase the speed then beat for 5 minutes until pale in colour, and light and airy in texture.


14. Spoon this into a disposable icing bag fitted with a star shaped nozzle (I used a Wilton 1M nozzle).
15. Pipe the icing onto the top in spiral pattern.
16. Sprinkle generously with the chocolate sprinkles.


17. Put the kettle on. Make yourself a coffee. Grab yourself a cupcake and enjoy your creations!

From my hamper I chose to use:
12 hole cupcake tin £1.99 This is a lovely and deep, teflon coated, non stick tin. What makes it even better is that you can put it in the dishwasher after you've used it! Always a bonus in my eyes being someone who hates washing up and tries to avoid it/delegate the task at all costs!

Slimline Electronic Kitchen Scales £6.99 These have an easy clean, stainless steel finish, are lightweight, slim and have an LED display.  They're powered by an easily available CR2032 battery (which is included). Not only do they weigh in both imperial and metric weights, but they have the added feature of being able to weigh fluid ounces or millilitres of both milk or water at the touch of a button; truly functional and cook friendly.  With the added 'tare' function, you simply weigh your ingredient out, press the button to return the scales to zero and weigh out each additional ingredient in the same way.  Again, this really does appeal to me as I can weigh all my ingredients out in one go and into one bowl; saving washing up!

Double Oven Gloves £2.99 Part of a co-ordinated range of matching products, these are 100% cotton with a 100% polyester filling.  They're a generous 18x92cm in size and more than big enough for the largest of hands whilst not being too large for little hands like mine. The hanging hook allows you to keep them handy near you oven and they're washable too.

Party Butler cake container £4.99 The ideal solution to storing and transporting your cakes, snacks or pizzas.  It's make from temperature resistant plastic which means you can easily clean this in the dishwasher (bonus!) It's the perfect size to store 24 decorated cupcakes, whilst the two integrated, fold down handles, mean that you can easily carry your bakes to share with friends and family.


I also received but haven't yet used:
Train silicone baking case £3.49
Measuring Jug Digital Kitchen Scale £6.99

The hamper and contents were provided to me free of charge from Aldi UK.  I was also provided with a gift voucher with which to purchase my ingredients to create my #BestBudgetBake recipe.


Thursday, 9 October 2014

Yorkshire Pudding the Rosie Way

For as long as I remember, mum always lovingly made us a Sunday roast dinner with home made Yorkshire puddings.  Though I always make mine by eye and estimate my quantities, just the way mum taught me all those years ago, in order to publish a recipe for you, I've had to translate my 'eye' into measurable quantities, so here goes!

30ml Oil (vegetable, rapeseed or olive oil - you choose your favourite)
125g Plain flour
2 Eggs
150ml Milk
Pinch salt
½ medium Onion, chopped

1. Heat your oven to 240˚C.
2. Pour your oil into a 25cm/10" square Pyrex dish and put it into your oven to heat up.
3. In a bowl, add the flour, eggs, milk and salt.
4. Beat or whisk until smooth and lump free.  The consistency you're looking for is that of single cream.
5. Stir in your chopped onion and set to one side to rest.
6. When the surface of your oil is shimmering, but not smoking, reduce the oven temperature to 220˚C and give your batter a quick stir.
7. Quickly remove the dish from the oven, but keep the oven door open for as short a time as possible.  It's ESSENTIAL to keep as much heat into the oven as is possible.
8. Pour the batter into the dish. It should sizzle as it hits the hot oil.
9. Swirl the batter around and up all sides of the dish. This will help it start to rise up the dish as it cooks.
10.  Quickly open the oven and place your dish straight back in, closing the door before the heat escapes, then DO NOT open the door until it's cooked.
11. Stand back and watch your Yorkshire Pudding cook. You can see when it's cooked as it'll be risen into golden crowns and be an amazing golden brown colour.


* I always cook my Yorkshire Pudding in a Pyrex dish as you can guarantee that it'll get wonderfully hot ready for your batter to go straight in and then it also won't stick.
* Have your oven door open for the shortest time possible.  Don't open it, take out your dish and leave it open whilst you pour your batter into it and then return it to the oven.  It's essential that you keep that oven HOT so it starts to cook the instant that it goes in.
* Reserve a couple of tablespoons of your Yorkshire Pudding batter to transform your meat juices into the most incredible tasting gravy by following yesterday's recipe.

Monday, 6 January 2014

Chocolate Fudge Cake

This is an incredibly moist chocolate cake that's not too sweet.  The chocolate fudge icing is a wonderful topping which balances it out perfectly.

300g Plain flour
1/4 tsp salt
450g Granulated sugar
2 Eggs
5ml Bicarbonate of Soda
125ml Milk
15ml Lemon Juice
250ml Water
250g Butter
3tbs Cocoa
5ml Vanilla
Icing:
150g Butter
30ml Water
5ml Vanilla
30ml Cocoa
325g Icing sugar

1. Heat the oven to 180C
2. In a large bowl, mix together the flour, salt, sugar, eggs, bi-carbonate of soda, milk and lemon juice.
3. Set aside for 5 minutes, whilst you:
4. Heat the water, butter, cocoa and vanilla extract together until the butter has melted.
5. Add the butter and water mix to the bowl and mix well to combine.
6. Grease a 25x30cm deep dish.
7. Pour the cake batter into the dish.
8. Cook for approximately 25 minutes until a skewer comes out clean.
9. Remove the cake from the oven and leave to cool in the dish.
10. Melt together the butter with the water and vanilla.
11. In a large bowl, mix together the icing sugar and cocoa.
12. Add the water and butter mixture into the icing sugar and cocoa and beat until thoroughly mixed, with no lumps.
13. Pour over the cake and leave to set.

I chose to make this for my daughter's 13th birthday in a bundt tin.  After cooking, I left it in the tin for 10 minutes before turning out on to a cooling rack until cold.  It was then transferred to a cake stand and the fudge icing poured over the top.  If you leave the fudge icing to set and cool for a few minutes you will find that it thickens up a bit and therefore coats the cake better.


Wednesday, 27 November 2013

Lemon Drizzle Cake

A cake with a crunchy, zingy top; perfect with a cup of tea.

100g Butter
175g Caster sugar
175g Self Raising Flour
5ml Baking powder
5ml Vanilla extract
2 eggs
30ml Milk
1 Lemon rind & juice
Topping:
1 Lemon juice
100g Granulated sugar

1. Preheat oven to 160C.
2. Grease & line an 18cm/7" deep round tin.
3. Beat all the ingredients for the cake together for 2-3 minutes with an electric mixer.
4. Pour into your prepared tin & level the top.
5. Bake for 35-40 minutes until a skewer inserted into the centre comes out clean.
6. Whilst the cake is baking, mix together the lemon juice and sugar for the topping.
7. As soon at the cake comes out of the oven, spread the topping mixture evenly over it whilst it's still hot.
8. Leave the cake in the tin to cool completely.
9. Turn out on to a serving plate.


Wednesday, 23 October 2013

Parmesan cheese Pastry

This is a beautifully flavoured pastry to make as the base for a quiche or for a pasty. With a twist of Parmesan to flavour and enrich your food, just add your imagination and see what you can tantalise your palate with. Enjoy!

200g Plain flour
100g Salted Butter, chilled and cut into small cubes
30g Parmesan cheese, grated
1 medium Egg yolk, beaten
35-45ml Cold water, straight from the fridge

The secret to a good pastry is to have your ingredients cold and to work quickly.  Ensure you make it early enough to be able to leave your pastry to rest in the fridge.  This prevents shrinkage in the oven when you cook it.

1. Tip your flour into a large bowl.  Don't worry about sifting it, you can give it a quick whisk to add some air and lighten it up as well as remove any lumps.
2. Add the cubed butter and, using your finger tips and thumbs, rub the butter into your flour until it resembles breadcrumbs.
3. Add the Parmesan cheese, and quickly work it through your flour & butter mixture until thoroughly combined.
4. Add the beaten egg yolk and about 35ml of your cold water and mix with a flat bladed knife until the pastry comes together. If required, you can add some more of your water, a bit at a time until the dough starts to stick and form a clump.
5. Tip your dough out on to a lightly floured surface and bring together completely with your hands, then quickly and lightly knead into a ball.
6. Wrap in cling film and place in the fridge to chill for 30 minutes.
7. When chilled, remove from the fridge, roll and use as required.

As a variation, when you add your cheese, why not also add:
* 10ml dried herbs such as parsley, sage or thyme for a cheese & herb pastry.
* 10ml caraway, poppy or sesame seeds.  This'll give it an extra crunch when cooked.
* pinch chilli powder for a little 'kick'

What will you make?  With ours, my daughter made a salmon and smoked cod flan.  I will share the recipe for that soon.  Until then.... X


Wednesday, 2 October 2013

Beef burgers

Everyone loves a burger from time to time, and to make your own surpasses the flavour of any shop bought, mass produce, additive containing, packed out with cheap filler, mush every time.  They're simple to make (involve the kids) and you can easily batch make these to freeze for a later date. So, lets burger off into the kitchen and get making!

10 Wholewheat crackers (or Cream Crackers or 2 slices of bread, crumbed)
Handful of fresh parsley, roughly chopped (use 1tbs dried if you don't have fresh)
15ml (1tbs) Wholegrain mustard (or any mustard you find in your fridge!)
1 Large egg
1 Medium onion, finely chopped
1 Red chilli, finely chopped
2 Cloves garlic, finely chopped
500g Minced beef (try to choose leaner beef if you can, as it'll ooze less fat when you cook it)
Salt & pepper

1. Tip all of your ingredients into a large bowl.
2. Get your hands in there and squish it all together until fully combined.
3. Divide into 8 equal(ish) portions.
4. Flatten into evenly shaped rounds resembling a burger (make sure they're about the same thickness so they all cook at the same time).


5. Preheat a griddle pan until very hot.
6. Cook for 4-5 minutes each side or until cooked through.

Serve in a roll with some tomato chutney, cheese & a bit of salad.

See, I told you it was easy!

If you don't want to use them all now, simply place a piece of waxed/grease proof paper between each one, bag them up and put into a freezer.  Defrost before cooking.

If you want to be all evenly shaped and pretty looking, you can buy a burger press with waxed discs fairly cheaply online or even from some of the supermarkets.

Monday, 30 September 2013

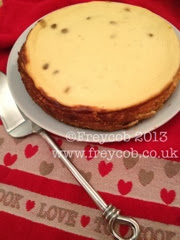
Baked Cheesecake

10 Digestive biscuits, crushed
65g Unsalted butter, melted
500g Fromage frais
500g Philadelphia cheese
4 Eggs
1 Lemon, zested & juiced
25g Plain flour
100g Caster sugar
75g Sultanas 

1. Preheat your oven to 170°C.
2. Grease & line the base of a round 23cm/9" loose bottomed tin.
3. Mix the biscuits & butter together and press firmly into the bottom of your tin.
4. Place in the fridge to cool while you prepare the filling.
5. Whisk together the Fromage frais, Philadelphia, eggs, lemon zest and juice, flour & sugar until fully combined and smooth.
6. Stir in the sultanas to evenly distribute.
7. Remove the tin from the fridge and pour your filling in to it.  Smooth the top.
8. Place in your oven for 50-55 minutes until you can see the edges just starting to brown and there is still the slightest wobble in the centre.
9. Switch off the oven, leaving the cheesecake inside.
10. Leave the door slightly open and leave the cheesecake in there to cool completely.
11. Remove the cold cheesecake from the oven and transfer it to a serving plate.


You can serve this on its own or with puréed apricots or cherries poured over the top.

If you prefer a chocolate version of this, then omit the lemon juice, zest and sultanas. Replace them with 2tbs of cocoa combined with 2tbs water.

Sunday, 21 April 2013

World Baking Day - I'm no.62

My recipe has been ranked at 62/100 in terms of 'braveability'.  I'd love you to come and Bake Brave with me.


You can find the recipe for my Choccoccino Cake  on their website.


Are you ready to join me?

X

Tuesday, 28 August 2012

Eva's Mushroom House

Eva is the daughter of one of my children's former junior school teachers. The original request was for a chocolate giant cupcake, but with the agreement of 'mum' she allowed me to play with an idea that I'd got in mind to upturn the base & decorate it as a giant mushroom.

I am so pleased at how this cake turned out. I freestyled with the idea as I went along; simply knowing that I wanted the 'roof' to be red with white hearts instead of spots. I also wanted a 'flying' butterfly overhead.

Mum tells me that Eva loved her cake, & her grandma tells me she loved it too!

Another successful cake from the kitchen of Freycob.


Friday, 30 December 2011

Chocolate Brownie

A well stocked store cupboard should contain all of the ingredients needed for this recipe.  Walnuts are optional, and can easily be excluded without affecting the recipe if you like.  So, let's get started...

100g (4oz) Plain flour
4 eggs
225g (8oz) Caster sugar
225g (8oz) Butter
50g (2oz) Cocoa Powder
2.5ml (½tsp) Baking Powder
7.5ml (1½tsp) Vanilla Extract
100g (4oz) Chocolate, chopped/Chocolate drops
16 walnut halves (optional)


1. Preheat the oven to 180°C/Fan 160°C/Gas 4.

2. Grease a 9" square tin and line the base with baking parchment.  I've found the best performing baking parchment is this one from Lakeland Limited.  I've used it loads and, so far, it's never stuck on me.


3. In your bowl place your flour, eggs, sugar, butter, cocoa powder, baking powder, and vanilla.  Mix together for several minutes until thoroughly combined.  I used my Kenwood Major on high speed for 4 minutes to incorporate as much air as possible.


4. Add the chocolate drops and stir until just mixed.


5. Pour into  your prepared tin, smooth the top and place 16 walnut halves on top to mark out each of the 16 pieces your brownie will be cut into.


6. Bake for 40-45 minutes.  You will notice that the top of a brownie sometimes 'bursts' through as it cooks.  This is normal; don't worry.

7. Test the brownie in the centre with a cocktail stick.  If it comes out fairly clean (a little bit of 'goo' is ok, but not lots!) then your brownie is cooked. If the cocktail stick is still very wet, then place the brownie back into the oven for 5 minutes and test again.  If the top is browning too much, then place a sheet of foil loosely over the tin for the last 10 minutes.


8. Remove from the oven.  Leave to rest for 2-3 minutes in the tin, then make sure that the edges aren't stuck to your tin (use a plastic spatula if you're using a non-stick metal tin.  Turn out onto your wire cooking rack.

Can be served either warm - with custard, cream or ice cream - or left to go cold and enjoyed with a nice cuppa while you put your feet up!

Enjoy!

Rosie
x
Related Posts Plugin for WordPress, Blogger...